Showing posts with label gimbal tarot T-2D. Show all posts
Showing posts with label gimbal tarot T-2D. Show all posts
12 January 2015
Aerial Showreel 2014
V017. Quick showreel of my best moments of 2014 recording video from a quadcopter. There are still many things to improve in order to obtain better shots and video quality, but so far I am pretty happy with the results of this past year.

30 December 2014
The Alcázar of Segovia (Spain) Aerial
V016.
The unique silhouette and privileged location of theAlcázar of Segovia, a UNESCO World Heritage site along with the massive aquaduct and town of Segovia which both lie nearby, is several centuries old, though the location has been in use as a fort since the 12th century. Primarily Gothic with Renaissance alterations, it was originally a fortress (year 1122), but has also been a royal palace. The castle is surrounded by two rivers–Clamores and Eresma–flowing on either side. These rivers not only provide water for the greenery around the castle, but also add an extra layer of defense.
Most part of the shots are from the front view. For safety reasons I didn´t fly over the entrance of the Alcázar, where all the visitors are walking around.
Setup:
Frame Tarot Iron Man 650
Maytech 620kv motors
30A T-Motor 400Hz ESC for multicopter
13x5.5 Carbon fiber propellers
Naza M Lite with GPS
DIY visor for GoPro and ND filter 3 stops
GoPro H3+ black, 1080x60, M FOV
5200mAh 3S 35C battery
Futaba R6208SB receiver
Fatshark FPV camera
Fatshark Predator goggles
ImmersionRC 600mw Tx
1000mAh 3S 20C battery for video Tx
Gimbal Tarot T-2D
500mAh 3S 20C battery for gimbal
Futaba 8FG Super Transmitter
The unique silhouette and privileged location of theAlcázar of Segovia, a UNESCO World Heritage site along with the massive aquaduct and town of Segovia which both lie nearby, is several centuries old, though the location has been in use as a fort since the 12th century. Primarily Gothic with Renaissance alterations, it was originally a fortress (year 1122), but has also been a royal palace. The castle is surrounded by two rivers–Clamores and Eresma–flowing on either side. These rivers not only provide water for the greenery around the castle, but also add an extra layer of defense.
Most part of the shots are from the front view. For safety reasons I didn´t fly over the entrance of the Alcázar, where all the visitors are walking around.
Setup:
Frame Tarot Iron Man 650
Maytech 620kv motors
30A T-Motor 400Hz ESC for multicopter
13x5.5 Carbon fiber propellers
Naza M Lite with GPS
DIY visor for GoPro and ND filter 3 stops
GoPro H3+ black, 1080x60, M FOV
5200mAh 3S 35C battery
Futaba R6208SB receiver
Fatshark FPV camera
Fatshark Predator goggles
ImmersionRC 600mw Tx
1000mAh 3S 20C battery for video Tx
Gimbal Tarot T-2D
500mAh 3S 20C battery for gimbal
Futaba 8FG Super Transmitter
22 December 2014
Aerial footage shot at the Iglesia de la Vera Cruz in Segovia
V015.
It has been a while since I recorded my last video Aerial real state, so I couldn´t wait for recording a new one! It was an early morning shot on a fine sunny day.
Consecrated in 1208, Vera Cruz was built by the Knights Templar to house a fragment of the True Cross. It is thus not really a parish church or even a monastic church, but primarily a shrine. Vera Cruz has a unique 12-sided exterior with a tower on the south side. Its shape is patterned on the Church of the Holy Sepulchre in Jerusalem, where according to legend the True Cross was found by St. Helena in the 4th century.
Setup:
Frame Tarot Iron Man 650
Maytech 620kv motors
30A T-Motor 400Hz ESC for multicopter
13x5.5 Carbon fiber propellers
Naza M Lite with GPS
DIY visor for GoPro and ND filter 3 stops
GoPro H3+ black, 1080x50, N FOV
5200mAh 3S 35C battery
Futaba R6208SB receiver
Fatshark FPV camera
Fatshark Predator goggles
ImmersionRC 600mw Tx
1000mAh 3S 20C battery for video Tx
Gimbal Tarot T-2D
500mAh 3S 20C battery for gimbal
Futaba 8FG Super Transmitter
It has been a while since I recorded my last video Aerial real state, so I couldn´t wait for recording a new one! It was an early morning shot on a fine sunny day.
Consecrated in 1208, Vera Cruz was built by the Knights Templar to house a fragment of the True Cross. It is thus not really a parish church or even a monastic church, but primarily a shrine. Vera Cruz has a unique 12-sided exterior with a tower on the south side. Its shape is patterned on the Church of the Holy Sepulchre in Jerusalem, where according to legend the True Cross was found by St. Helena in the 4th century.
Setup:
Frame Tarot Iron Man 650
Maytech 620kv motors
30A T-Motor 400Hz ESC for multicopter
13x5.5 Carbon fiber propellers
Naza M Lite with GPS
DIY visor for GoPro and ND filter 3 stops
GoPro H3+ black, 1080x50, N FOV
5200mAh 3S 35C battery
Futaba R6208SB receiver
Fatshark FPV camera
Fatshark Predator goggles
ImmersionRC 600mw Tx
1000mAh 3S 20C battery for video Tx
Gimbal Tarot T-2D
500mAh 3S 20C battery for gimbal
Futaba 8FG Super Transmitter
13 August 2014
Removing GoPro fish eye
Here you can see the difference between the original footage (1080, 60fps, M FOV) and the results removing the fish eye with the lens distortion effect (value: -15) in Premiere. In my opinion recording in medium (or wide) FOV helps preventing the jello effect and makes the footage look nicer.
27 July 2014
Aerial Real State
V014. Recording date: 21-07-2014
Some scenes have been filmed with FPV. The GoPro Hero 3 with medium FOV, in my opinion, makes the video look better and probably helps avoiding jello and vibrations in comparison to recording in narrow FOV. I used the ND filter (3 stops) too.
Here you can see the difference between the original footage (1080, 60fps, M FOV) and the results removing the fish eye with the lens distortion effect (value: -15). In my opinion recording in M FOV helps preventing the jello effect and makes the footage look nicer.
http://niropter.blogspot.com/2014/07/removing-gopro-fish-eye.html
Setup:
Frame Tarot Iron Man 650
Maytech 620kv motors
30A T-Motor 400Hz ESC for multicopter
13x5.5 Carbon fiber propellers
Naza M Lite with GPS
DIY visor for GoPro and ND filter 3 stops
GoPro H3 black, 1080x60, M FOV
5200mAh 3S 35C battery
Futaba R6208SB receiver
Fatshark FPV camera
Fatshark Predator goggles
ImmersionRC 600mw Tx
1000mAh 3S 20C battery for video Tx
Gimbal Tarot T-2D
500mAh 3S 20C battery for gimbal
Futaba 8FG Super Transmitter
Some scenes have been filmed with FPV. The GoPro Hero 3 with medium FOV, in my opinion, makes the video look better and probably helps avoiding jello and vibrations in comparison to recording in narrow FOV. I used the ND filter (3 stops) too.
Here you can see the difference between the original footage (1080, 60fps, M FOV) and the results removing the fish eye with the lens distortion effect (value: -15). In my opinion recording in M FOV helps preventing the jello effect and makes the footage look nicer.
http://niropter.blogspot.com/2014/07/removing-gopro-fish-eye.html
Setup:
Frame Tarot Iron Man 650
Maytech 620kv motors
30A T-Motor 400Hz ESC for multicopter
13x5.5 Carbon fiber propellers
Naza M Lite with GPS
DIY visor for GoPro and ND filter 3 stops
GoPro H3 black, 1080x60, M FOV
5200mAh 3S 35C battery
Futaba R6208SB receiver
Fatshark FPV camera
Fatshark Predator goggles
ImmersionRC 600mw Tx
1000mAh 3S 20C battery for video Tx
Gimbal Tarot T-2D
500mAh 3S 20C battery for gimbal
Futaba 8FG Super Transmitter
21 July 2014
Flying the Iron Man 650 with Tarot T-2D gimbal
V013. Recording date: 21-07-2014
After recording the Countryside aerial video I had to wait for a landing leg spare part. I reviewed the balance of the propellers and went to fly. I used the ND filter for these sceenes, but I also tried without it and could not be able to find the difference...
I tested the max tilt for the GPS mode, and it is quite fast. In Atti mode the quad makes some funny movements due to not 100% prop balance I guess. Too much wind affects as well the general behaviour, or it does this weird movements by itself...
The GoPro is in Medium FOV, but removed the fish eye in post.
Setup:
Frame Tarot Iron Man 650
Maytech 620kv motors
30A T-Motor 400Hz ESC for multicopter
13x5.5 Carbon fiber propellers
Naza M Lite with GPS
DIY visor for GoPro and ND filter 3 stops
GoPro H3 black, 1080x60, M FOV
5200mAh 3S 35C battery
Futaba R6208SB receiver
Fatshark FPV camera
Fatshark Predator goggles
ImmersionRC 600mw Tx
1000mAh 3S 20C battery for video Tx
Gimbal Tarot T-2D
500mAh 3S 20C battery for gimbal
Futaba 8FG Super Transmitter
After recording the Countryside aerial video I had to wait for a landing leg spare part. I reviewed the balance of the propellers and went to fly. I used the ND filter for these sceenes, but I also tried without it and could not be able to find the difference...
I tested the max tilt for the GPS mode, and it is quite fast. In Atti mode the quad makes some funny movements due to not 100% prop balance I guess. Too much wind affects as well the general behaviour, or it does this weird movements by itself...
The GoPro is in Medium FOV, but removed the fish eye in post.
Setup:
Frame Tarot Iron Man 650
Maytech 620kv motors
30A T-Motor 400Hz ESC for multicopter
13x5.5 Carbon fiber propellers
Naza M Lite with GPS
DIY visor for GoPro and ND filter 3 stops
GoPro H3 black, 1080x60, M FOV
5200mAh 3S 35C battery
Futaba R6208SB receiver
Fatshark FPV camera
Fatshark Predator goggles
ImmersionRC 600mw Tx
1000mAh 3S 20C battery for video Tx
Gimbal Tarot T-2D
500mAh 3S 20C battery for gimbal
Futaba 8FG Super Transmitter
8 May 2014
Contryside aerial with Tarot Iron Man 650 and Naza M Lite with GPS
V012. Recording date: 03-05-2014
After the last huge crash with the FY450, I decided to start a new project with the Tarot frame Iron Man 650, and lower kv motors, different ESCs and bigger propellers. See here the mayden flight.
In this video I test the gimbal Tarot T-2D with the new firmware (v1.5) and modified gains to try to reduce vibrations and making the tilt movements smoother (see previous post). Tiny yaw movements still pending to be improved...
It was a windy day and I could not risk to get closer to the water or to a different location, as the quad was still doing some funny movements from time to time. And because of the wind I still get some vibrations, specially when the movements are faster, or I´m not quite slow when ascending or descending. I also reckon that using the GPS mode does not help to get rid of vibrations...
Despite of this I think the results are not bad. By the way, I can´t really make the online video look as smoother as the original one, I still need to play around with the Premiere settings in order to obtain some better footage when I upload it. Actually it looks nicer from a smaller screen :).
Music by Matthew Mullane.
Setup:
Frame Tarot Iron Man 650
Maytech 620kv motors
30A T-Motor 400Hz ESC for multicopter
13x5.5 Carbon fiber propellers
Naza M Lite with GPS
DIY visor for GoPro and ND filter 3 stops
GoPro H3 black, 1080x60, N FOV
5200mAh 3S 35C battery
Futaba R6208SB receiver
Fatshark FPV camera
Fatshark Predator goggles
ImmersionRC 600mw Tx
1000mAh 3S 20C battery for video Tx
Gimbal Tarot T-2D
500mAh 3S 20C battery for gimbal
Futaba 8FG Super Transmitter
After the last huge crash with the FY450, I decided to start a new project with the Tarot frame Iron Man 650, and lower kv motors, different ESCs and bigger propellers. See here the mayden flight.
In this video I test the gimbal Tarot T-2D with the new firmware (v1.5) and modified gains to try to reduce vibrations and making the tilt movements smoother (see previous post). Tiny yaw movements still pending to be improved...
It was a windy day and I could not risk to get closer to the water or to a different location, as the quad was still doing some funny movements from time to time. And because of the wind I still get some vibrations, specially when the movements are faster, or I´m not quite slow when ascending or descending. I also reckon that using the GPS mode does not help to get rid of vibrations...
Despite of this I think the results are not bad. By the way, I can´t really make the online video look as smoother as the original one, I still need to play around with the Premiere settings in order to obtain some better footage when I upload it. Actually it looks nicer from a smaller screen :).
Music by Matthew Mullane.
Setup:
Frame Tarot Iron Man 650
Maytech 620kv motors
30A T-Motor 400Hz ESC for multicopter
13x5.5 Carbon fiber propellers
Naza M Lite with GPS
DIY visor for GoPro and ND filter 3 stops
GoPro H3 black, 1080x60, N FOV
5200mAh 3S 35C battery
Futaba R6208SB receiver
Fatshark FPV camera
Fatshark Predator goggles
ImmersionRC 600mw Tx
1000mAh 3S 20C battery for video Tx
Gimbal Tarot T-2D
500mAh 3S 20C battery for gimbal
Futaba 8FG Super Transmitter
5 May 2014
Some issues during the flight with the Tarot T-2D gimbal and the Naza controller
It is still a bit confusing to define the origin of some of the issues I have had for this test flight with the Tarot T-2D gimbal.
In one hand I am having vibrations in footage in two different scenarios:
The last issue I have been experiencing, is some stability issues with some of my batteries.
When I charge them they seem to be all right (3.20v per cell). But when I fly, the quad has a high tendency to pitch, roll, or both, and It´s really difficult to control. It normally ends up in a non-soft landing. It seems those batteries are faulty, I´m following this page to try to discover what is going on...
In one hand I am having vibrations in footage in two different scenarios:
- When I speed up forward
- When I tilt the gimbal up or down
Maybe it was too windy, and because of the GoPro visor and the wind resistance, the tilt suffer and fails. And I guess that speeding up produces more vibrations, but there should be a way of avoiding this. There are a lot of shoots that require high speed, and obviously there are lots of days with some wind, so there should be a way of solving these problems.
Regarding the tilt problem, I have been reading some posts that advise to install the 1.5 version to avoid the vibrations and shaking produced by the gimbal motors.
Here you can see how to update the latest firmware (download the 1.5 version here), and this video is great to play around with you gain settings and check the behavior after that.
What I have solved for sure is the initial shaking of the gimbal motors when the quad is still on the ground, but there are still some vibrations left when moving the quad forward and backward (tilting the camera) as you can see in this video I have recorded:
I have also seen what it seems to be a general problem with the Naza controller and the barometer when the sun hits directly at the left side of the controller. I don´t know if this is my case, but just for prevention I´m using some black tape for covering its sides. This is one of the videos you will find in YouTube with this issue:
The last issue I have been experiencing, is some stability issues with some of my batteries.
 |
| KyPOM Battery 2200mAh 25C 11.1V |
20 April 2014
Placing the Tarot T-2D gimbal with GoPro Hero 3 on the Iron Man 650
After the successful mayden flight of the Tarot Iron Man 650 (apart from landing!), now it is the moment of placing the Tarot T-2D gimbal with the GoPro Hero 3.
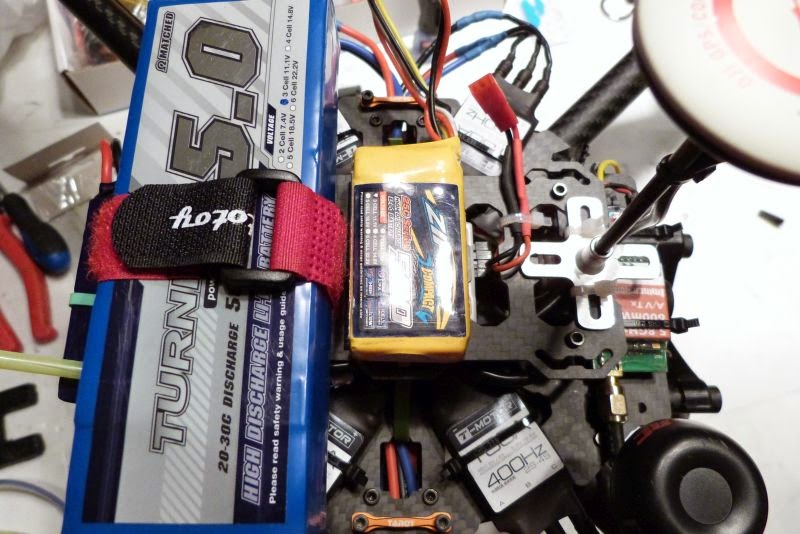
As I don´t want the propellers neither the quad legs to appear on camera, I have to place the gimbal on the front of the quad. As this unbalances the whole quadcopter, I have to redistribute some items on the top plate. This means placing the GPS of the Naza on the front, the gimbal battery on the middle, and the main battery on the bottom of the top plate.
I have set up the end point of the gimbal in the transmitter, so when the camera is looking to the front the propellers never appear on camera. But what if I lean it to the front to much because I go fast forward? and if the camera is facing down and I lean it to the right or left? In the angle is too wide then the propellers or the legs are very likely to appear on the footage. I will test it soon.
Now the weight of the quadcopter has gone up to 2,18kg with the bigger battery (Turnigy 3S 5000 mAh). I don´t spect it to fly now for 13 minutes, but hopefully it reaches 10 minutes easily.
I will put the visor as well to avoid the shadow of the motors on camera.
UPDATE:
I was not convinced about the gimbal position, so I´ve used longer tubes to place the camera further from the center of the quad. Now it is much more difficult to have the propellers on camera when going forward, or the legs when the camera is facing down and moving from side to side.
I have several batteries of 2200 mAh, that gives me just a few minutes of flight, so I have made a serial wire so I can join two of them having 4400 mAh.
I have also purchased a 45C 5200 mAh Blue Monster battery with 4S instead 3S which is what I usally use. I will test it to see the difference. I expect to have more flight time despite of the weight of the whole quad that goes now up to 2,35 kg more or less.
Because of all the mess described above, I have had to redistribute the weight so the quad is balanced. I´ve put a rear battery plate that seems to do the job.
Hopefully tomorrow is not raining and I can go out there and see what happens...
As I don´t want the propellers neither the quad legs to appear on camera, I have to place the gimbal on the front of the quad. As this unbalances the whole quadcopter, I have to redistribute some items on the top plate. This means placing the GPS of the Naza on the front, the gimbal battery on the middle, and the main battery on the bottom of the top plate.
I have set up the end point of the gimbal in the transmitter, so when the camera is looking to the front the propellers never appear on camera. But what if I lean it to the front to much because I go fast forward? and if the camera is facing down and I lean it to the right or left? In the angle is too wide then the propellers or the legs are very likely to appear on the footage. I will test it soon.
Now the weight of the quadcopter has gone up to 2,18kg with the bigger battery (Turnigy 3S 5000 mAh). I don´t spect it to fly now for 13 minutes, but hopefully it reaches 10 minutes easily.
I will put the visor as well to avoid the shadow of the motors on camera.
.JPG "Tarot Iron Man 650 - Gimbal Tarot T-2D - Naza M Lite GPS (1)") |
| Tarot Iron Man 650 - Gimbal Tarot T-2D |
.JPG "Tarot Iron Man 650 - Gimbal Tarot T-2D - Naza M Lite GPS (1)") |
| Redistributing the elements on the top plate |
.JPG "Tarot Iron Man 650 - Gimbal Tarot T-2D - Naza M Lite GPS (1)") |
| Iron Man 650 with Naza and FPV |
.JPG "Tarot Iron Man 650 - Gimbal Tarot T-2D - Naza M Lite GPS (1)") |
| Front view of the Iron Man 650 with Tarot T-2D gimbal |
.JPG "Tarot Iron Man 650 - Gimbal Tarot T-2D - Naza M Lite GPS (1)") |
| Top view of the Iron Man 650 with Tarot T-2D gimbal |
.JPG "Tarot Iron Man 650 - Gimbal Tarot T-2D - Naza M Lite GPS (1) weight") |
| Weight of the Tarot Iron Man 650 with T-2D gimbal and FPV |
I was not convinced about the gimbal position, so I´ve used longer tubes to place the camera further from the center of the quad. Now it is much more difficult to have the propellers on camera when going forward, or the legs when the camera is facing down and moving from side to side.
I have several batteries of 2200 mAh, that gives me just a few minutes of flight, so I have made a serial wire so I can join two of them having 4400 mAh.
I have also purchased a 45C 5200 mAh Blue Monster battery with 4S instead 3S which is what I usally use. I will test it to see the difference. I expect to have more flight time despite of the weight of the whole quad that goes now up to 2,35 kg more or less.
Because of all the mess described above, I have had to redistribute the weight so the quad is balanced. I´ve put a rear battery plate that seems to do the job.
Hopefully tomorrow is not raining and I can go out there and see what happens...
 |
| Blue monster 5200 mah battery lipo |
 |
| Serial wire for lipo batteries |
 |
| Tarot Iron Man 650 Battery holder |
 |
| Tarot Iron Man 650 Folded arms |
 |
| Tarot Iron Man 650 Gimbal Tarot T-2D GoPro Hero 3 |
 |
| Tarot Iron Man 650 Top plate |
18 April 2014
Aerial MTB Enduro with quadcopter
V011. Recording date: 23-03-2014
This has been the first time I shot video flying with the Naza M Lite with GPS flight controller. So in one hand I was feeling more confident in case of losing video signal or disorientation, but in the other hand I was a bit nervous because of my lack of practice with this controller.
I´m a bit disappointed because of the jello effect. As you can see, most part of it is at the beginning of the video. I´m not quite sure about the causes yet. I think it´s a mix of:
- vibrations of the motors (mainly when I go forward pretty fast)
- the propellers don´t fit exactly as they should
- I use bullet propeller holders
- maybe flying in GPS mode?
- too bright conditions with the GoPro. Under these conditions it uses a very fast shutter speed which records all the tiny high-frequency vibrations from your motors, props, etc., and causes this rolling shotter effect, or jello.
Fixing this is still a priority in my To-Do list, as I have to eliminate lot´s of shots that could be used perfectly in the final footage because of the jello. I will try to reduce part of it using a neutral density filter to reduce the shutter speed but letting through enough light for a clear picture. This is how I do it: http://niropter.blogspot.com.es/
Please check your compass is pointing in the same direction as the nose of the quad! After a bad landing, I didn´t realise it rotated almost 45º right, so it was nearly impossible to control it in the air. I still don´t know how I managed to land it. You can easily crash it and cause an accident.
Apart from that, the experience of recording a rider descending the hill at high speed has been amazing. Most part of the times I could not caught him up!
Setup:
Frame Whirlwind FY450
BL-2830/11 1000kv motors
20A SK ESC
10x4.5 Carbon fiber propellers
Naza M Lite with GPS
GoPro H3 black, 1080x60, N FOV
3300mAh 3S 20C battery
Futaba 8FG Super Transmitter
Futaba R6208SB receiver
Fatshark FPV camera
Fatshark Predator goggles
ImmersionRC 600mw Tx
1000mAh 3S 20C battery for video Tx
Gimbal Tarot T-2D
500mAh 3S 20C battery for gimbal
Plastic landing gear
This has been the first time I shot video flying with the Naza M Lite with GPS flight controller. So in one hand I was feeling more confident in case of losing video signal or disorientation, but in the other hand I was a bit nervous because of my lack of practice with this controller.
I´m a bit disappointed because of the jello effect. As you can see, most part of it is at the beginning of the video. I´m not quite sure about the causes yet. I think it´s a mix of:
- vibrations of the motors (mainly when I go forward pretty fast)
- the propellers don´t fit exactly as they should
- I use bullet propeller holders
- maybe flying in GPS mode?
- too bright conditions with the GoPro. Under these conditions it uses a very fast shutter speed which records all the tiny high-frequency vibrations from your motors, props, etc., and causes this rolling shotter effect, or jello.
Fixing this is still a priority in my To-Do list, as I have to eliminate lot´s of shots that could be used perfectly in the final footage because of the jello. I will try to reduce part of it using a neutral density filter to reduce the shutter speed but letting through enough light for a clear picture. This is how I do it: http://niropter.blogspot.com.es/
Please check your compass is pointing in the same direction as the nose of the quad! After a bad landing, I didn´t realise it rotated almost 45º right, so it was nearly impossible to control it in the air. I still don´t know how I managed to land it. You can easily crash it and cause an accident.
Apart from that, the experience of recording a rider descending the hill at high speed has been amazing. Most part of the times I could not caught him up!
Frame Whirlwind FY450
BL-2830/11 1000kv motors
20A SK ESC
10x4.5 Carbon fiber propellers
Naza M Lite with GPS
GoPro H3 black, 1080x60, N FOV
3300mAh 3S 20C battery
Futaba 8FG Super Transmitter
Futaba R6208SB receiver
Fatshark FPV camera
Fatshark Predator goggles
ImmersionRC 600mw Tx
1000mAh 3S 20C battery for video Tx
Gimbal Tarot T-2D
500mAh 3S 20C battery for gimbal
Plastic landing gear
2 April 2014
Trying to get rid of the shutter effect (jello) with ND filters
Yes, I´m still trying to get rid of jello! It seems that shooting with the GoPro under too bright conditions, it uses a very fast shutter speed which records all the tiny high-frequency vibrations from your motors, props, etc., and causes this rolling shutter effect, or jello.
Fixing this is still a priority in my To-Do list, as I have to eliminate lot´s of shots that could be used perfectly in the final footage because of the jello. I will try to reduce part of it (or all If I´m lucky!) using a neutral density filter to reduce the shutter speed but letting through enough light for a clear picture.
There are some already made filters for the GoPro but are a bit expensive, and who knows if they are going to solve my problem... so I prefer to go first for a DIY solution and see what happens.
This is the solution I have come up with, for under $5:
.JPG "GoPro Hero 3 - Neutral Density filter - Tarot T2D - Reducing Jello")
.JPG "GoPro Hero 3 - Neutral Density filter - Tarot T2D - Reducing Jello")
.JPG "GoPro Hero 3 - Neutral Density filter - Tarot T2D - Reducing Jello")
.JPG "GoPro Hero 3 - Neutral Density filter - Tarot T2D - Reducing Jello")
.JPG "GoPro Hero 3 - Neutral Density filter - Tarot T2D - Reducing Jello")
.JPG "GoPro Hero 3 - Neutral Density filter - Tarot T2D - Reducing Jello")
.JPG "GoPro Hero 3 - Neutral Density filter - Tarot T2D - Reducing Jello")
.JPG "ND filter - Neutral Density filter - Tarot T2D - Reducing Jello")
.JPG "ND filter - Neutral Density filter - Tarot T2D - Reducing Jello")
.JPG "GoPro lens damaged - no lens protector")
Fixing this is still a priority in my To-Do list, as I have to eliminate lot´s of shots that could be used perfectly in the final footage because of the jello. I will try to reduce part of it (or all If I´m lucky!) using a neutral density filter to reduce the shutter speed but letting through enough light for a clear picture.
There are some already made filters for the GoPro but are a bit expensive, and who knows if they are going to solve my problem... so I prefer to go first for a DIY solution and see what happens.
This is the solution I have come up with, for under $5:
- Lens protector ($4.57)
- A piece of cardboard (used to avoid the shadow of the propellers on the lens)
- A thin cord
- A neutral Density filter (I have used a .9, that reduces light 3 stops)
- Glue
Steps:
- Cut the cardboard with the shape of a trapezium.
- Long side: 4.5cm
- Short side: 2.5cm
- Height: 2.5cm
- Cut the plastic base of the lens protector so it fits the holder of the GoPro Gimbal. I guess you can use it without this holder to reduce weight too...
- Glue the lens protector to the holder. I highly recommend to always use the lens protector (with or without filter). I´ve commited the mistake of not using it and I´ve damaged the lens :( (see picture below).
- Cut a circle of 3cm of diameter from a piece of ND filter. You can either buy it, or ask for a filter sample bock at a photography store. The samples have the perfect fit for the GoPro and you have lots of them to try!
- Glue the thin cord to the border of the filter, in order of being able to take it out from the lens protector. This is due to the holder of the gimbal, that has a smaller diameter than the protector itself.
- Insert the filter into the lens protector.
- Glue the cardboard (the visor) over the lens protector, and use the WiFi preview of the GoPro to check if you need to cut a bit more the visor in order to not appear on the shot (I had to do it to avoid it using the wide FOV).
So let´s fly and see what happens!
3 March 2014
Replacing KK2 board with NAZA M Lite with GPS
I've been thinking for long to get a flight control board with GPS, in order of improving safety when flying, and another nice features.
There are several boards available, but I've decided to buy the DJI NAZA M Lite with GPS. It's not the most advanced model, but it has the features I want and it's affordable.

.jpg "Naza M Lite with GPS")
It offers three types of control modes:
Configuring the Futaba S8FG. I use the SBUS for connecting the the Naza main controller (MC) with the Futaba R6208SB receiver. Just one cable :). I´ve created a new model and selected the following channels:

The next step is reversing the channels, if needed. In my case I had to reverse the rudder and the right slider for the gimbal.
I guess the settings for activating the fail safe depends on your transmitter. In my case I used the Throttle and the ch7 for activating it. I´ve tried two ways of doing it:
Relating the end point configuration, I have the first 4 channels and the IOC with the default values, and I have only modified the remote gain control, the flight mode to be more precise with the selection, and the gimbal pitch control.
Naza and Futaba SBUS connection
There are several boards available, but I've decided to buy the DJI NAZA M Lite with GPS. It's not the most advanced model, but it has the features I want and it's affordable.
For entry-level enthusiasts, DJI now brings out the most cost-effective solution, the NAZA-M Lite flight control system. As the simplified version of NAZA-M, it inherits the high reliability and stability of NAZA-M. The innovative All-in-one design simplifies installation and saves space and weight. It contains inner damping, controllers, 3-axis gyroscope, 3-axis accelerometer and barometer in its light and small Main Controller. It can measure flying altitude, attitude and therefore can be used for autopilot/automatic control.
It offers three types of control modes:
- GPS Atti. Mode (with GPS module): when you release the sticks, it locks the current position.
- Atti. Mode: when you release the sticks, the attitude is stabilized.
- Manual Mode.
- Course Lock: the forward direction is the same as a recorded nose direction (the nose direction is recorded when the battery is connected)
- Home Lock: the forward direction is the same as the direction from home point to the multi-rotor.
- Deactivated
- Failsafe mode: when the communication between the main controller and the transmitter is disconnected and the GPS module is used, you can set Return To Home (RTH) so the multi-rotor will come back to the taking off position and land by itself. You can also set the failsafe for landing wherever the multi-rotor is at that moment.
- Low voltage protection: in order to prevent your multi-rotor from crashing or other harmful consequences caused by low battery voltage, the multi-rotor will descend and land if you are using GPS atti mode or atti mode.
- Gimbal stabilization: the system will adjust the gimbal and camera according to the attitude of the multi-rotor after setting the parameters the first time.
Physical set up
 |
| Versatile Unit, directly welded to the frame. |
 |
| Front |
 |
| Front connections |
 |
| Left |
 |
| Right |
 |
| Top |
 |
| Back |
Configuring the Futaba S8FG. I use the SBUS for connecting the the Naza main controller (MC) with the Futaba R6208SB receiver. Just one cable :). I´ve created a new model and selected the following channels:
- ch5: Remote gain control
- ch6: IOC: three positions: off, course lock, home lock
- ch7: Flight mode: three positions: manual, atti, atti GPS
- ch8 Tarot T-2D gimbal pitch control. I preffer to connect the gimbal pitch cable directly to the receiver at this point, and being able to control its orientation using the right slider of the transmitter. If you connect it to the F2 port of the Naza MC, the gimbal will automatically be orientated depending on the multi-rotor attitude, and as far as I know, you won´t be able to control the pitch...
.jpg "Futaba 8FG transmitter Naza M Lite GPS setup") |
| Model type |
.jpg "Futaba 8FG transmitter Naza M Lite GPS setup") |
| Channel selection |
.jpg "Futaba 8FG transmitter Naza M Lite GPS setup") |
| Channel selection |
The next step is reversing the channels, if needed. In my case I had to reverse the rudder and the right slider for the gimbal.
.jpg "Futaba 8FG transmitter Naza M Lite GPS setup") |
| Channel reverse |
I guess the settings for activating the fail safe depends on your transmitter. In my case I used the Throttle and the ch7 for activating it. I´ve tried two ways of doing it:
- When the signal is lost (either the multi-rotor is out of range or you switch the transmitter off) the fail safe is activated.
- Sacrificing the manual flight mode position and configure it for activating the fail safe manually. If you do this, then you won´t be able to calibrate the compass from now on until you configure the manual position again. For this reason I prefer the option 1, and be able to have manual flight mode and calibrating whenever I want.
.jpg "Futaba 8FG transmitter Naza M Lite GPS setup") |
| Fail safe |
.jpg "Futaba 8FG transmitter Naza M Lite GPS setup") |
| Fail safe |
Relating the end point configuration, I have the first 4 channels and the IOC with the default values, and I have only modified the remote gain control, the flight mode to be more precise with the selection, and the gimbal pitch control.
- When the signal is lost (either the multi-rotor is out of range or you switch the transmitter off) the fail safe is activated.
- Sacrificing the manual flight mode position and configure it for activating the fail safe manually. If you do this, then you won´t be able to calibrate the compass from now on until you configure the manual position again. For this reason I prefer the option 1, and be able to have manual flight mode and calibrating it whenever I want.
.jpg "Futaba 8FG transmitter Naza M Lite GPS setup") |
| End point |
 |
| End point |
The following videos have been really useful to me in order of having the quad working with the Naza. Well, I could not configure the home lock, for some reason the VU shows the red light, but I´m into it.
Naza and Futaba SBUS connection
Naza installation and setup guide (3 parts)
You should read as well the quick start guide for the Naza M Lite with GPS. You will find how to use the software and many other tips and things to have into account.
From this page of DJI, you´ll need to download the Assistant Software and the Driver installer. Follow the previous video and you won´t have any problem at all :).
And now let´s wait until it stops raining and get this thing into the air to check the behavior!!
8 February 2014
Motocross aerial test with quadcopter
V010. Recording date: 01-02-2014
I broke one propeller some days ago hitting a tree branch, so I replaced them with DJIs, the only available at the store, as I wanted to fly asap. They don't fit perfectly with my motors, I reckon that could be one of the reasons why there's some jello on the footage. Besides, the cylinder of one of the propellers adapter holder is a bit bended because of that crash, and that's giving me vibrations for sure...
It was not the perfect day for flying: 25mph wind gust and my first time with too many moving objects on stage. Keeping my eyes only on the FPV screen was really complex, as the wind was taking the quad quite far away in a matter of seconds. For that reason I recorded 85% of the videos at a guess looking directly at the quad, and that's why I couldn't make another shoots I had in mind, like from a really high altitude facing down, or following the rider more closely, etc... I chose not to risk this time and avoid problems!
I'm still dealing with the slow motion settings in Sony Vegas, as I haven't been able to make these scenes look smoother. This time I've desabled resampling, and added the envelope velocity to set the speed at 50% (30fps). In previous videos (https://vimeo.com/niropter) I didn't take into account the fps for slow motion scenes, going under 30fps with the smart resample activated (apparently not good for fast scenes with dark background), and clicking the edge of the video and dragging while pressing control.
Setup:
Frame Whirlwind FY450
BL-2830/11 1000kv motors
20A SK ESC
10x4.5 Carbon fiber propellers
KK2 controller board
GoPro H3 black, 1080x60, N FOV
3300mAh 3S 20C battery
Futaba 8FG Super Transmitter
Futaba R6208SB receiver
Fatshark FPV camera
Fatshark Predator goggles
ImmersionRC 600mw Tx
1000mAh 3S 20C battery for video Tx
Gimbal Tarot T-2D
500mAh 3S 20C battery for gimbal
Plastic landing gear
I broke one propeller some days ago hitting a tree branch, so I replaced them with DJIs, the only available at the store, as I wanted to fly asap. They don't fit perfectly with my motors, I reckon that could be one of the reasons why there's some jello on the footage. Besides, the cylinder of one of the propellers adapter holder is a bit bended because of that crash, and that's giving me vibrations for sure...
It was not the perfect day for flying: 25mph wind gust and my first time with too many moving objects on stage. Keeping my eyes only on the FPV screen was really complex, as the wind was taking the quad quite far away in a matter of seconds. For that reason I recorded 85% of the videos at a guess looking directly at the quad, and that's why I couldn't make another shoots I had in mind, like from a really high altitude facing down, or following the rider more closely, etc... I chose not to risk this time and avoid problems!
I'm still dealing with the slow motion settings in Sony Vegas, as I haven't been able to make these scenes look smoother. This time I've desabled resampling, and added the envelope velocity to set the speed at 50% (30fps). In previous videos (https://vimeo.com/niropter) I didn't take into account the fps for slow motion scenes, going under 30fps with the smart resample activated (apparently not good for fast scenes with dark background), and clicking the edge of the video and dragging while pressing control.
Setup:
Frame Whirlwind FY450
BL-2830/11 1000kv motors
20A SK ESC
10x4.5 Carbon fiber propellers
KK2 controller board
GoPro H3 black, 1080x60, N FOV
3300mAh 3S 20C battery
Futaba 8FG Super Transmitter
Futaba R6208SB receiver
Fatshark FPV camera
Fatshark Predator goggles
ImmersionRC 600mw Tx
1000mAh 3S 20C battery for video Tx
Gimbal Tarot T-2D
500mAh 3S 20C battery for gimbal
Plastic landing gear
15 January 2014
Pitch control test and GPH3 FPV aerial
V009. Recording date: 12-01-2014
On this occasion, I've replaced the Turnigy 9XR transmitter for the Futaba 8FG Super with the R6208SB receiver. Is not that the Turnigy is giving me any trouble (maybe interferences with GPH3 WiFi https://vimeo.com/84377244?), but as I'm improving the equipment of the quad, I preffer to control it with a more reliable transmitter. This radio is excellent, and the settings are so easy and quick to configure. The transmission between the radio and the receiver is much faster with the Futaba, you can definitely feel this when flying.
I have also conected the pitch control of the Tarot T-2D gimbal to one free channel of the receiver, so now I can turn the camera face down using the right slider of the radio. I'm also transmitting the FPV video directly from the GoPro, so I can see exaclty what I'm recording. It takes a while until getting used to FPV trough the camera while it's being stabilized by the gimbal, as you loose reference of the quad position.
I replaced the plastic propellers with carbon fiber ones, so they won't brake on air, and they can help holding the weight (1.7kg) of the quad. I've noticed though, that some turbulences are created when descending vertically unless I do it really slow, or while moving it in any direction.
If you wonder about the crash at the end of the video... I connected the voltage alarm to the gimbal battery instead to the main one!! So it did not have power enought to hold the falling. Just minor damage, but happened to me twice already :O
Setup:
Frame Whirlwind FY450
BL-2830/11 1000kv rotors
20A SK ESC
10x4.5 Carbon fiber propellers
KK2 controller board
GoPro H3 black, 1080x60, N FOV
3300mAh 3S 20C battery
Futaba 8FG Super Transmitter
Futaba R6208SB receiver
Fatshark FPV camera
Fatshark Predator goggles
ImmersionRC 600mw Tx
1000mAh 3S 20C battery for video Tx
Gimbal Tarot T-2D
500mAh 3S 20C battery for gimbal
Plastic landing gear
On this occasion, I've replaced the Turnigy 9XR transmitter for the Futaba 8FG Super with the R6208SB receiver. Is not that the Turnigy is giving me any trouble (maybe interferences with GPH3 WiFi https://vimeo.com/84377244?), but as I'm improving the equipment of the quad, I preffer to control it with a more reliable transmitter. This radio is excellent, and the settings are so easy and quick to configure. The transmission between the radio and the receiver is much faster with the Futaba, you can definitely feel this when flying.
I have also conected the pitch control of the Tarot T-2D gimbal to one free channel of the receiver, so now I can turn the camera face down using the right slider of the radio. I'm also transmitting the FPV video directly from the GoPro, so I can see exaclty what I'm recording. It takes a while until getting used to FPV trough the camera while it's being stabilized by the gimbal, as you loose reference of the quad position.
I replaced the plastic propellers with carbon fiber ones, so they won't brake on air, and they can help holding the weight (1.7kg) of the quad. I've noticed though, that some turbulences are created when descending vertically unless I do it really slow, or while moving it in any direction.
If you wonder about the crash at the end of the video... I connected the voltage alarm to the gimbal battery instead to the main one!! So it did not have power enought to hold the falling. Just minor damage, but happened to me twice already :O
Setup:
Frame Whirlwind FY450
BL-2830/11 1000kv rotors
20A SK ESC
10x4.5 Carbon fiber propellers
KK2 controller board
GoPro H3 black, 1080x60, N FOV
3300mAh 3S 20C battery
Futaba 8FG Super Transmitter
Futaba R6208SB receiver
Fatshark FPV camera
Fatshark Predator goggles
ImmersionRC 600mw Tx
1000mAh 3S 20C battery for video Tx
Gimbal Tarot T-2D
500mAh 3S 20C battery for gimbal
Plastic landing gear
Subscribe to:
Posts (Atom)